Room air conditioners are basically tiny central air systems. They run on the same principles, but they are smaller and often cost more to run per unit of cooling power. Depending on the BTU rating and the layout of your home, a single window unit might chill just the bedroom it sits in, or it might push cool air into the adjacent hallway or living space.
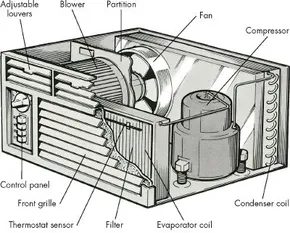
Inside that metal box, everything is tightly packed. You have the compressor, two fans, a motor, and thermostat controls, all sandwiched between the evaporator and condenser coils.
Dirt is the enemy here. It coats the evaporator coil, reducing efficiency. It clogs the fan blades that push cold air into the room. It blocks the drain ports, leading to leaks. It chokes the filter.
Most internal components—the coils, compressor, motor—are sealed. You should not try to repair these yourself. That is professional work. But you can handle minor maintenance. You can also remove the entire unit from its mounting bracket and take it to a repair shop if the problem is major. This saves you a service call fee.
In the winter, weather is the enemy. If you leave the unit in the window, cover the outside portion with a commercial cover or heavy plastic sheeting secured with duct tape. Alternatively, just remove it and store it indoors.
Safety First: Capacitors
Before you touch anything inside a window AC, unplug it.
Room air conditioners have one or two capacitors. They are located behind the control panel, near the fan. These capacitors store electricity. Even when the power is off, they hold a charge. If you touch them, you can get a severe shock.
Unplug the unit. Discharge the capacitor using the method in your owner’s manual. If you do not know how to do this safely, leave it alone. Call an AC technician.
Maintenance: Filters and Coils
Routine maintenance on the filter, power cord, coils, switch, thermostat, drain ports, and fan prevents catastrophic failure. Here is how to handle the basics.
Clean or Replace the Filter
Do this at the start of every cooling season. Then, do it once a month during the season. If you live in a dusty area, do it more often.
- Remove the front grille.
- Take out the filter.
- Most units use a washable filter made of sponge rubber.
- Clean it with mild household detergent and water.
- Rinse it well.
- Let it dry completely.
- Reinstall it.
Some units use throwaway filters, similar to furnace filters. If yours is dirty, replace it with a new one of the same type. Do not try to wash a disposable filter. It will disintegrate.
Check the Power Cord
The power cord connects the AC to the wall outlet. It can wear out and fail to supply electricity.
To check it:
1. Remove the control panel.
2. Unscrew the cord terminals.
3. Attach a test wire across the bare lead wires.
4. Hook the clips of a volt-ohm-milliammeter (VOM) set to the RX1 scale to the prongs of the cord’s plug.
5. If the meter reads zero, the cord is good.
6. If it reads higher than zero, replace the cord.
Clean the Evaporator and Condenser Coils
Clean the coils at the start of the cooling season. Then every month during the season. More often if you are in a dusty zone.
Use a vacuum cleaner. It pulls the dust out of the fins without damaging them.
If the fins are bent, use a fin comb. You can buy these at most appliance parts outlets. The comb slides into the spaces between the fins. Be careful. The fins are light-gauge aluminum. They bend easily. If you force the comb, you will crush the fins and reduce airflow.
Troubleshooting the Switch
The selector switch is behind the control panel. It turns the unit on.
If the AC does not run at any setting, but it is receiving power, the switch is likely faulty.
- Remove the control panel.
- Locate the switch.
- Check the terminals for burnt insulation or burn marks.
- If you see burning, replace the switch with a new one of the same type.
- Unscrew the old switch.
- Connect the new one in the same way.
If the problem persists after replacing the switch, call a professional.
Why Your Window AC Leaks Water
The thermostat and drain ports are critical. If they are blocked or malfunctioning, your unit will leak water onto your sill or floor. This is a common issue in older window units that were not cleaned regularly.
Cleaning the drain ports is simple. Use a small brush or a pipe cleaner to remove sludge. Ensure the unit is tilted slightly outward so water drains outside, not in.
Final Thoughts
You do not need to call a pro for everything. A clean filter, straightened fins, and a good switch can make a dead unit breathe again. But respect the sealed components. Respect the capacitors. And always unplug before you start.
If you ignore the dirt, the efficiency drops. If you ignore the drain, the water damage spreads. The choice is yours.