There is a specific kind of chaos that happens when you try to squeeze a passion project into a spare corner. It starts with thread spools rolling under the bed. Then the pins scatter like tiny mines. Before you know it, your beloved sewing machine is buried under a mountain of half-finished quilts or garment pieces.
For anyone who stitches, this is the nightmare scenario.
A dedicated sewing room changes the dynamic. It stops being a storage closet and starts being a workshop. But design isn’t just about buying shelves. It’s about workflow. A quilter needs massive cutting space. A garment maker needs hanging rails and light. If you try to cram everything into a generic “craft corner,” you end up avoiding the room entirely.
The goal here is simple. Create an environment where every bobbin, needle, and waiting project has a home. This isn’t just about aesthetics. It’s about functionality. You need a space that supports the actual work you do.
Why Customization Matters in Sewing Room Design
Generic storage solutions rarely work for serious makers. The reason? The tools vary wildly by craft.
Think about the difference in needs.
* Quilters require large, flat surfaces for cutting fabric grids. They need racks for bulky quilts while they work.
* Garment Seamstresses often need vertical space for hanging garments during fitting or pressing. They prioritize thread organization and small-part storage for buttons and zippers.
If you borrow ideas from Pinterest without filtering them through your own workflow, you’ll end up with a pretty room that doesn’t actually help you sew.
“Design a room that truly supports your needs and the work that you do.”
This means grabbing a cup of tea and really thinking about your habits. Do you sort by color? By project? By thread type? Your storage must match your mental model.
Starting with Inspiration and Intent
The best sewing rooms don’t just appear. They are pulled together from existing examples, but adapted.
Look at photos of finished rooms. Pull out the ideas that resonate. Maybe you love the island table in a studio setup. Maybe you prefer the wall-mounted pegboards seen in compact apartments. Collect these images. But then, strip them down.
Ask yourself:
* What do I use daily?
* What do I use monthly?
* What do I store away for seasons?
Your answer dictates your layout.
This isn’t about achieving a perfect balance of style and function. It’s about reducing friction. When you walk into the room, you shouldn’t have to hunt for scissors. You shouldn’t have to dig through a bin to find a spool of matching thread.
The dream is a room where the clutter doesn’t have a place to land. Where the machine sits ready. Where the fabric is within reach.
It starts with knowing exactly what you need. Not what looks good in a magazine. What you need to make the next stitch.
Taming the Fabric Stash
Let’s be real: most sewers have a fabric hoard. It’s not just a hobby; it’s a collection. The hardest part isn’t picking a pattern. It’s figuring out where to put the three hundred yards of linen waiting for a project that might never happen.
Start by auditing. List everything. Every bobbin. Every spool. Every leftover scrap. If it doesn’t have a home, it becomes clutter.
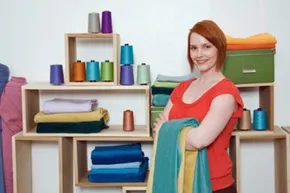
For the fabric itself, a wall of cubbies works better than a closet. You need visibility. Fold them by color or designer. Or maybe by project. The system only matters if you can find what you’re looking for in under ten seconds. A chest of drawers is fine, too, if you label the bins. Just don’t stack them blindly. You’ll lose hours digging for that one specific floral print.
Clear Views and Pegboard Perfection
Small stuff disappears fast. Buttons. Threads. Elastic. Ribbons. Clear glass jars on a hanging shelf solve this. You see the contents. You grab what you need. You put it back. It’s that simple.
But your tools need a different approach. Pegboard is non-negotiable for regular access. Hang your scissors, seam rippers, rotary cutters. The empty spaces are key. They force you to put things back. No more scavenger hunts for the exact shade of black thread you used last Tuesday.
Paint the pegboard. Pick a color that complements your wall. Frame it. Treat it like art. It’s functional, sure, but it also looks intentional. Not like a utility closet. Like a workspace.
Books and the Decluttering Rule
You probably have sewing books and magazines stacked up. Maybe you bought them for inspiration. Maybe you never opened them.
Add shelving. Dedicated shelves. Not random stacks on a desk.
Here’s the hard part: pick a time of year to weed them out. If a book isn’t relevant to your current skill level or interests, it’s dead weight. Donate it. Sell it. Toss it. Clarity starts with removing the obsolete.
Setting the Mood
Your room should reflect your creativity. Not just store it.
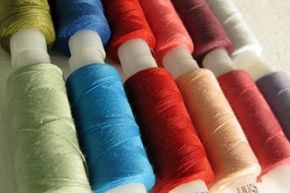
Stop treating your craft space like a storage unit. It needs to be a place where you actually want to spend time. White walls feel sterile. Pick a hue that sparks joy and highlights the room’s best angles.
Blue and green work wonders for calm. They push walls back visually, making tight spaces feel breathable. If you have a larger footprint, warm tones—reds, oranges, yellows—draw the room in. It becomes cozy. Comfortable. A place to stay.
Let Your Supplies Speak
You don’t need extra knick-knacks. Your fabric stash is already colorful. Texture-rich. Stop hiding it.
Open shelving turns your inventory into decor. Display those beloved prints. Let them breathe. If you create slipcovers, put them on chairs. Valances over windows? Yes. Cushions on benches? Absolutely.
Dress forms and mannequins add vertical interest. They look professional even if you only make quilts. They break up flat walls.
Floor Choices for Fabric Lovers
Carpet feels good underfoot. But consider the cleanup.
Snips of thread. Scraps. Lint. A vacuum gets clogged. A broom and dustpan on bare wood floors? Faster. Easier. You’ll spend less time cleaning and more time stitching.
“Store colorful fabrics on open shelves so they become part of the décor.”
Practical Setup for Efficiency
Lighting matters. Natural light is ideal, but for evening work, invest in adjustable task lighting. Shadows hide mistakes. Bright, even light reveals them.
Organization is key to keeping inspiration fresh. Label bins clearly. Keep scissors and measuring tapes within arm’s reach. A dedicated ironing board that folds away saves floor space.
Consider your workflow. Where do you cut? Where do you sew? Where do you finish? Arrange furniture to minimize steps between these zones.
Safety first. Keep an emergency kit nearby. Include scissors for cutting bandages, tweezers for splinters, and antiseptic. Accidents happen. Be prepared.
Where to Start?
If you’re overwhelmed, start small. Paint one wall. Install one shelf. Clear your sewing machine station.
Don’t try to build the perfect studio in a day. It evolves. As your projects grow, so will your needs. Adjust as you go.
What’s the one thing missing from your current space? Is it light? Storage? Comfort? Fix that first. The rest will follow.

Building Your Sewing Station
The layout you choose needs to support your actual workflow. Stress over organization often comes from trying to fit an ideal process into a space that isn’t cooperating. Start with the sewing machine. It’s the anchor of the room.
Your setup depends on two things: how many machines you own and the shape of the room. A U-shape arrangement is the gold standard for efficiency. It keeps everything within arm’s reach. If your space is long and narrow, forget the U-shape. Go with a straight line or an L-shape instead. Both options work well in tight quarters.
The Cutting and Pressing Zone
You can’t cut fabric if you don’t have a flat surface. Position a cutting table near your sewing station. Make it counter-height. It needs to be large enough to handle the full width of your fabric, not just scraps. A small table won’t cut it.
Your pressing area can be simpler. An ironing board is often enough. Place it close by so you aren’t lugging hot projects across the room. Keep this zone clear of clutter. Heat requires space and safety.
Storage Solutions
Wall space is prime real estate. Use it all. You need drawers for small notions. Cubbies for bulkier items. Shelving for fabric bolts. Everything needs a designated home. If you don’t have a place for it, you’re just making messes.
Leave a little room for creativity. An inspiration board is a smart addition. If you have the wall space, a design wall lets you lay out projects before sewing. It prevents costly mistakes.
Lighting and Comfort
Natural light helps, but windows aren’t enough. You need overhead lighting. Add task lights at each work station. Eyes strain under poor light, and you’ll make more errors.
Finally, buy a good chair. You’ll spend hours there. Your back will thank you. Skip the cheap seat. Invest in ergonomic support.
“The best sewing rooms are designed around the workflow, not the furniture.”